What You’ll Need to Build Diecast Cars
Embarking on the journey of building your own diecast cars is an exciting and rewarding hobby that blends creativity, technical skill, and a passion for miniature vehicles. Before you start, it’s essential to gather all the necessary components and tools to ensure a smooth and enjoyable building experience. This initial step sets the foundation for the entire process, determining the quality and appearance of your final product. You will need a diecast car base, which can be a ready-made model. Also, you will require various paints and finishing materials. Make sure you have various types of brushes for detailed painting work. Finally, have some glues and adhesives to combine the different parts of the diecast cars.
Essential Tools and Materials for Diecast Cars
The right tools and materials are the backbone of any successful diecast car building project. Investing in quality tools and materials will not only enhance your building process but also improve the final outcome. You’ll need a variety of tools, including a hobby knife for precise cutting and trimming. You’ll also want to invest in small screwdrivers, pliers, and tweezers for assembling and manipulating small parts. A well-ventilated workspace is also crucial, especially when working with paints and adhesives. Make sure you have different types of paint, for both the body and other parts of the model. Prepare some different types of paint, for example, acrylic and enamel, and have a good supply of thinners, and primers. Also, you might need masking tape.
Choosing the Right Diecast Car Base

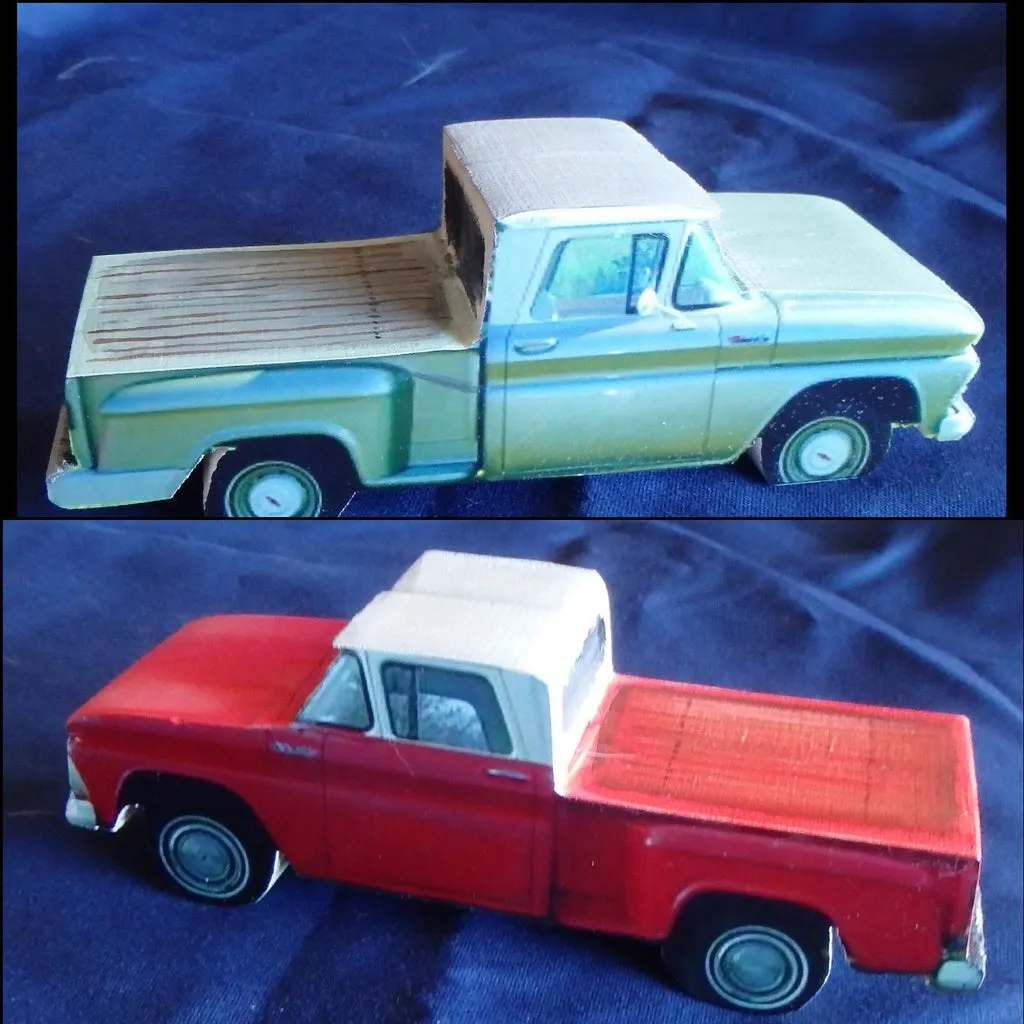
Selecting the appropriate diecast car base is the first crucial step in your building journey. The base car serves as the foundation upon which you will build your custom creation, so choosing wisely is essential. Consider factors such as the car’s make and model, the level of detail, and the availability of aftermarket parts. You can choose to build a car you’ve always dreamed of, or to improve the looks of an existing model. Also consider the scale of the car; the most popular scales are 1:18, 1:24, and 1:43. Consider your skill level; beginners might find it easier to start with simpler models, while more experienced builders can tackle complex designs. Buying a pre-assembled diecast car is an alternative too.
Step-by-Step Guide to Diecast Car Building
Building a diecast car is a meticulous process that requires patience, precision, and a methodical approach. By following a detailed step-by-step guide, you can navigate the process efficiently and achieve professional-looking results. This guide outlines the key stages involved in building a diecast car, from preparing the base to adding final details. Each step builds upon the previous one, so it’s important to take your time and ensure that each stage is completed correctly. This will help you to avoid mistakes that can be difficult to correct later. Before you start working, make sure your workspace is well-lit and organized. This will help you to see all the details of the car and reduce the risk of making mistakes. First, you should prepare the car base and remove any old paint. After that, you can start working on the paint of your car. When it dries, you can add details and the wheels.
Preparing the Diecast Car Body
Preparing the diecast car body is a crucial step in the process, as it directly impacts the final appearance and quality of your custom build. Before applying any new paint or modifications, it’s essential to remove any existing paint, imperfections, or details that are not desired. Begin by carefully disassembling the diecast car. Gently remove all the components, such as the wheels, windows, and interior. This will allow you to have a better access to all the areas of the body. Then, remove the existing paint using appropriate paint strippers or sanding techniques. Be patient and thorough, as any remaining paint will affect the adhesion of the new paint. Ensure that the surface is completely smooth and clean, creating a flawless canvas for your custom design.
Removing Old Paint and Detailing

Removing old paint and detailing on a diecast car is a meticulous process, requiring patience and the right techniques. The methods you choose will depend on the type of paint used. If you are dealing with enamel or lacquer paints, paint strippers will be your best friend. However, always test the stripper on a small, inconspicuous area first. Apply the stripper, wait for it to soften the paint, then gently scrape it off with a plastic scraper. For more intricate detailing, such as removing tiny emblems or logos, use a hobby knife or a fine-grit sanding stick. These tools allow for precision and control, enabling you to preserve the details you want to keep. Once the paint is removed, thoroughly clean the body to remove any residue, and make sure the surface is smooth.
Painting and Customizing Your Diecast Car
Painting and customizing your diecast car is where your creativity truly shines. This is where you transform a simple base model into a unique creation that reflects your personal style. Begin by choosing the paint color and finish that you want. Acrylic paints are popular for their ease of use and quick drying times, while enamel paints offer a durable, glossy finish. Apply several thin coats of paint, allowing each coat to dry before applying the next one. This approach helps to prevent drips and ensures an even finish. Once the base coat is dry, you can start adding custom details. Consider adding decals, pinstripes, or other decorative elements to create a unique look. Finally, apply a clear coat to protect your paint job and add a professional finish.
Choosing the Right Paint and Techniques
Selecting the right paint and mastering painting techniques is essential for achieving a professional finish on your diecast car. The choice of paint greatly impacts the final look. Acrylic paints are favored for their ease of use, quick drying, and wide range of colors, ideal for beginners. Enamel paints, known for their durability and glossy finish, provide a more resilient coating. For a flawless finish, use an airbrush, as it offers precise control and minimizes brush strokes. If you are using spray cans, maintain a consistent distance and apply thin, even coats to prevent runs and drips. Proper ventilation is crucial. Also, remember to prime your model before painting, which helps the paint to adhere better and enhances the final color. Sanding between coats with fine-grit sandpaper is an essential step for removing imperfections.
Adding Details and Finishing Touches

Adding details and finishing touches to your diecast car is the final stage, bringing your project to life. This step involves adding intricate details that will make your model stand out. Use fine-tipped paintbrushes or detail pens to add elements like headlights, taillights, and interior features. When the painting is complete, consider adding decals or water-slide transfers to replicate logos, stripes, or intricate designs. Ensure the decals are applied carefully, smoothing out any air bubbles. To protect the paint and decals, apply a clear coat. Reassemble the car, ensuring all components are securely in place. Finally, step back and admire your creation, the culmination of your effort.
Wheel and Tire Replacement
Replacing the wheels and tires on your diecast car is a simple but effective way to enhance its appearance and add a touch of realism. When choosing wheels, consider the style, size, and material that best suits the car’s design. Metal wheels often provide a higher level of detail, while plastic wheels are easier to work with. Tires come in various tread patterns and compounds. Before removing the old wheels, ensure you have the necessary tools. You will need a small screwdriver, pliers, or a hobby knife. Gently detach the wheels from the car. Next, select the new wheels and tires and ensure they fit properly. Secure the new wheels to the car. This small step can significantly improve the overall look of your diecast model.
Final Assembly and Detailing of Diecast Cars
The final assembly and detailing of your diecast car is the culmination of all your hard work and attention to detail. Start by reassembling the car, carefully attaching all the components you removed during the initial disassembly phase. Ensure that all parts are securely in place. Next, add any final detailing touches. These could include small touches like adding mirrors, windshield wipers, or door handles. Use a fine-tipped brush to add small details, such as pin striping or highlighting specific features. To protect your work and give the car a professional finish, consider applying a clear coat. This not only adds a layer of protection but also enhances the overall look. Once everything is in place, take a moment to admire your completed diecast car. You’ve successfully transformed a base model into a unique and personalized creation.